A good friend of mine while in a market somewhere in Africa found a merchant selling knives for $5 US and he stopped to pour through the man's shop until he found what he called "the only thing worth calling a knife" and bought it. That was some years ago and two years ago he heard I was into leather work and asked if I would consider making him a sheath. And this last Tuesday--yes I am embarrassed--I finally returned the knife to him with a significant face lift.


BEFORE PICTURE:

Now a few things to know. The sheath was a loosely weaved thick chorded (5-ply strand) cotton canvas like material. The snaps used to hold the cloth fastener around the handle had pulled through, and in a moment of none-to-careful handling I discovered the knife tip had sliced through the bottom of the sheath as well. Things were in a pretty sad state of affairs. And before anyone complains about a sepia tone setting on the camera, knife colors really were that washed out.
My good friend served in the United States Marine Corp in at least one theater of war. We do not talk about his experiences other than my occasional "thank you" for his service, and when I have questions about small group tactics as I am trying to get good enough at Warhammer 20,000 to hold my own against my 14 year old son. This is important as this project started out as a labor of love and when asked about what kind of a sheath he might want he literally replied "You will know it when you find it."
So with that kind of pressure it took me almost 18 months to find the right kind of design to put on the sheath. Ideas popped into my head and popped back out as they were either over worked, too stylized, or they seemed really cool one day only to be utter crap the next. I wanted something that would reflect my friends character in a way that would honor him. In the 18 months he continued to demonstrate an immense and incredible loyalty. Not just to me, but to everyone in our shared circle of friends. He is an uncomplicated guy. That is not to say he is simple, if you assume that, he will shatter your perspective and when he figures out you underestimated him, you will miss out on one of the best friends you could hope to ever have.
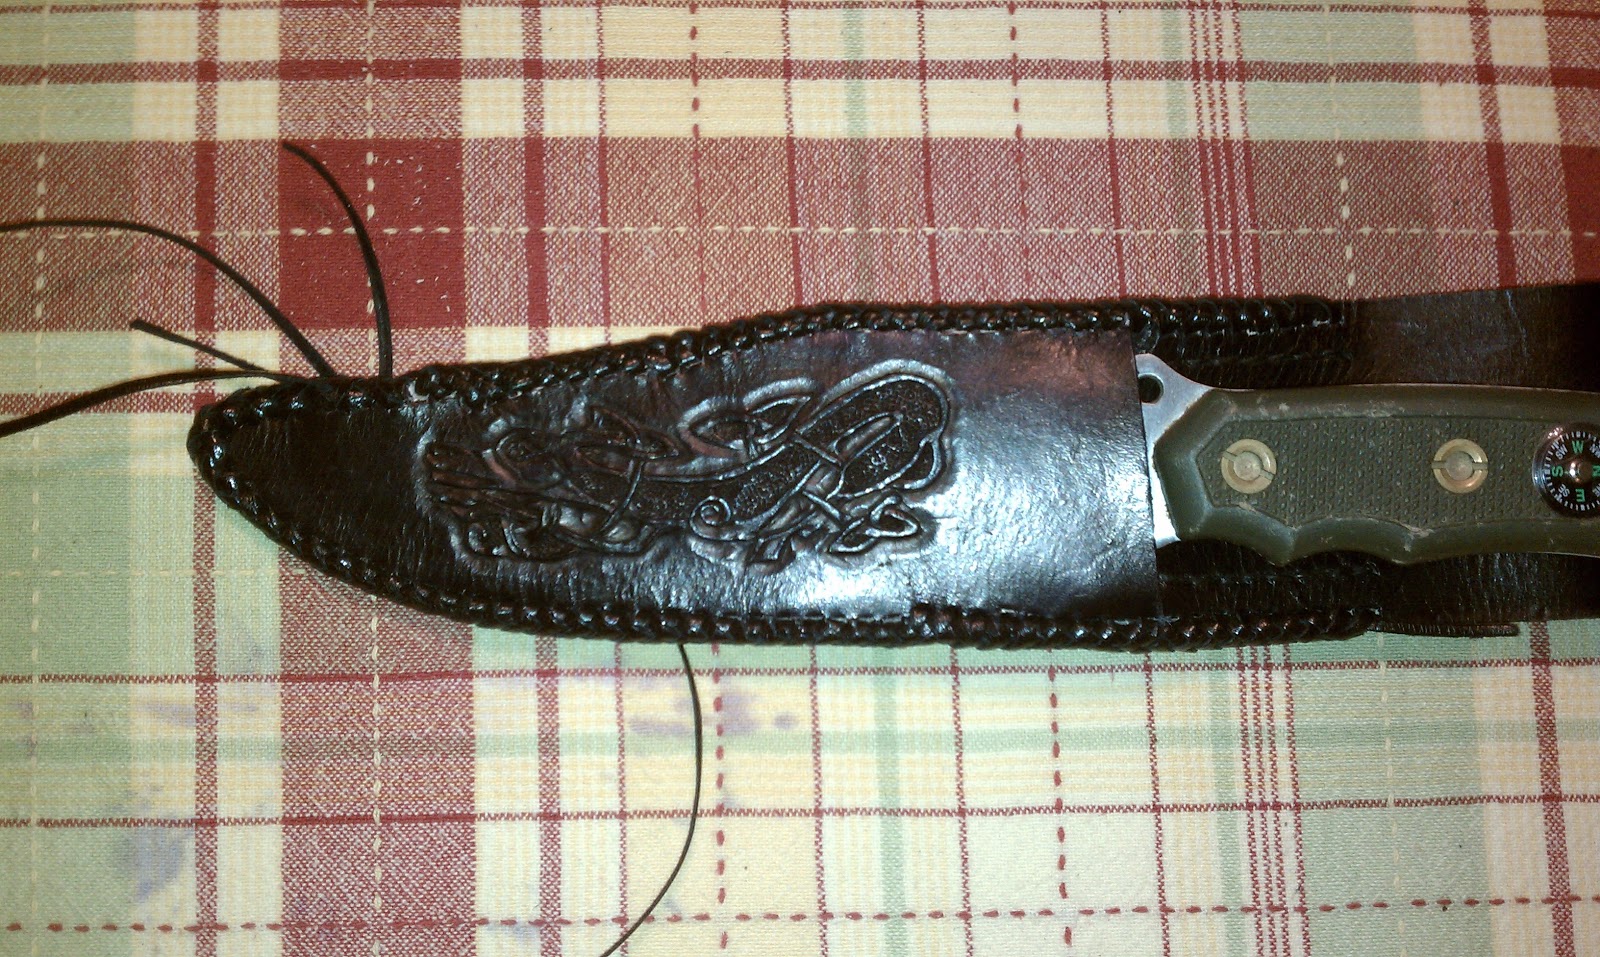
Slowly the design gravitated towards a simple single image engraved on the sheath that would underscore his unflagging loyalty and commitment to his friends, and most especially to his wife. When I stumbled across a website that indicated the Celtic Knotted Hound was a symbol of a warrior and most often connoted loyalty and bravery the quest was nearing its end! While celtic artwork is fantastic to look at when well executed, it is an absolute pain in the to do it well enough to make it pop, and there is always a mistake made. Okay, at least in my work that is true. So I avoid celtic knots with a passion. But the design was so perfect and then I found this in my resource library:

Determined to find a way not to do this particular piece of artwork on this particular sheath I made a paper template of the knife, traced the pattern, and laid out all the pieces to give them a good view convinced I could find a way to say "NO!" Not sure you will agree but the following picture said "TO BAD!" so strongly that I rolled up my sleeves and started working in earnest.

This is on the flesh side of the 4oz leather I used to make the sheath. I used dividers set at 1/4" (6mm) to determine the outline of the pieces, cut them, and then used scraps to make the welt. In this case I decided to do a standard thickness welt on the back edge of the knife to give the sheath some natural fit and used the same thickness along the knife edge to protect the thonging I planned to use to hold the pieces together. To make this work at the false edge of the blade the 4 oz welt was skived to 2 oz thickness to the blade tip, from that point onward I used 2oz leather that was skived to 1.5oz. The shell leathers were skived all the way around to a very shallow angle of about 60 degrees. Everything fit skin tight!
This picture has the welts glued in place and held by push pins. For those of you who know I enjoy doing period work, sometimes modernity is just too convenient, so push pins worked, and they stay in the tool bag. If you need an inexpensive high quality cutting board, the one I found at Ikea is hard to beat and is the surface you see in this picture. It is the right density to stand-up to cutting work and is a very convenient size.

This was front side of the sheath which before being used as a pin cushion had the pattern traced, carved, and stamped in a more US Western tooling style. It seemed important to make this image as bas-relief as possible. And keeping with celtic knot tradition there is a small mistake in the tooling and it will be confessed should you find it. A cooler head prevailed against starting over and the work pressed ahead.

A lot of my earliest work would shrink or move in odd ways as it was tooled. To minimize or eliminate this movement the leather is cased, strips of packing tape are applied to the flesh side in one direction, and then a second layer of tape rotated 90 degrees to the first layer. It also provides a useful hand hold when carving by pinching a portion of the tape between thumb and forefinger to rotate, and the pinky and ring fingers keep the work from sliding on the cutting board. This kind of design used to take an hour to complete the initial carving. Carving and stamping completed in 75 minutes.
Upon completion this was dyed using Fiebing's USMC black which after one coat gave the sheath a blued iron tint. Simple saddle stitching seemed to detract from the look to me, so Mexican Round Braid was used with 3/32" (2.5mm) latigo lace to hold the pieces together. It turned out really well and revealed a few lessons to be learned moving forward. Believe it or not the total length of thonging used is nearly 27 feet (9 yards or 8.7m). It was a long evening of wasting my brain watching something on TV, and my fingers hurt, and my arms were tired, but it was totally worth the effort.
This picture does not do the impact of this look justice. The carving seems to have withdrawn back into the leather of the sheath and has lost some of its pop. Not true if you were to see this directly. Feelings of accomplishment when the stray thongs were trimmed were swiftly dashed when the look of the handle was compared to the hard work put into the sheath itself. It made the work and time invested appear cheap and simplistic. So I asked for permission to give the knife a new handle, and with the owner's blessing accomplished the following look. The handle is black palm, and I re-used the screws from the original handle to put everything together. To improve resilience a two part epoxy was used to set the knife scales in place.

Something you do not know about my good friend is that he tends to be a man of very few words. He would give John Wayne's "The Silent Man" a sound whooping in terms of the number of words spoken, their relative import, and the density of meaning they convey. As I understand it he works in a shop that repairs and restores dials and equipment found in the cockpits of planes of all sizes. So he is fantastically critical of the work he sees. Thus I was hoping for a pursed lip review, a small "hmmmm", and then a nod. That would indicate that he critically review the work, appreciated the effort, and really liked the result. I got all that, plus a a very direct "thank you this is great".
He is happy and that is all that matters. Semper Fidelis my good friend, Semper Fidelis.
NOTE: if you would like to see more photographs of this work in progress with additional details and challenges about the work please see my photo book here Knife Sheath Photo Journey
No comments:
Post a Comment